Setting up a VM
I have had many questions on how to set up a VM for a number of different use-cases. This is the best guide to follow for how to set this up.
I reserve the right not to help with specific VM-related issues if you experience issues. Some base level technical knowledge is required to follow this guide.
If you find a mistake in this document, please ping me (cubityfirst) in the Elite Farmers Discord
Why farm in a VM?
Playing inside of a VM has one major benefit. You can bind additional HID peripherals from outside of the VM to the VM exclusively. This allows you to input on the game separately to any other application on your computer, allowing you to play multiple games at once, navigate around your computer, or use your computer for more than just farming.
Requirements
- A modern computer that is capable of virtualization and has it enabled. (You can check if it's enabled in Task Manager -> Performance -> CPU ->Virtualisation : Yes)
- A spare keyboard and mouse. (if you want to control the VM independently)
Steps
- Download VMWare Workstation Pro from Broadcom. You will need to make an account.
- Download a Windows 11 ISO from Microsoft. (Under the header "Download Windows 11 Disk Image (ISO) for x64 devices")
- Run the installer for VMWare Workstation Pro
- Skip through & install the application.
- Open VMWare Workstation Pro
- Select
Use VMWare Workstation 17 for Personal Useand pressContinue.
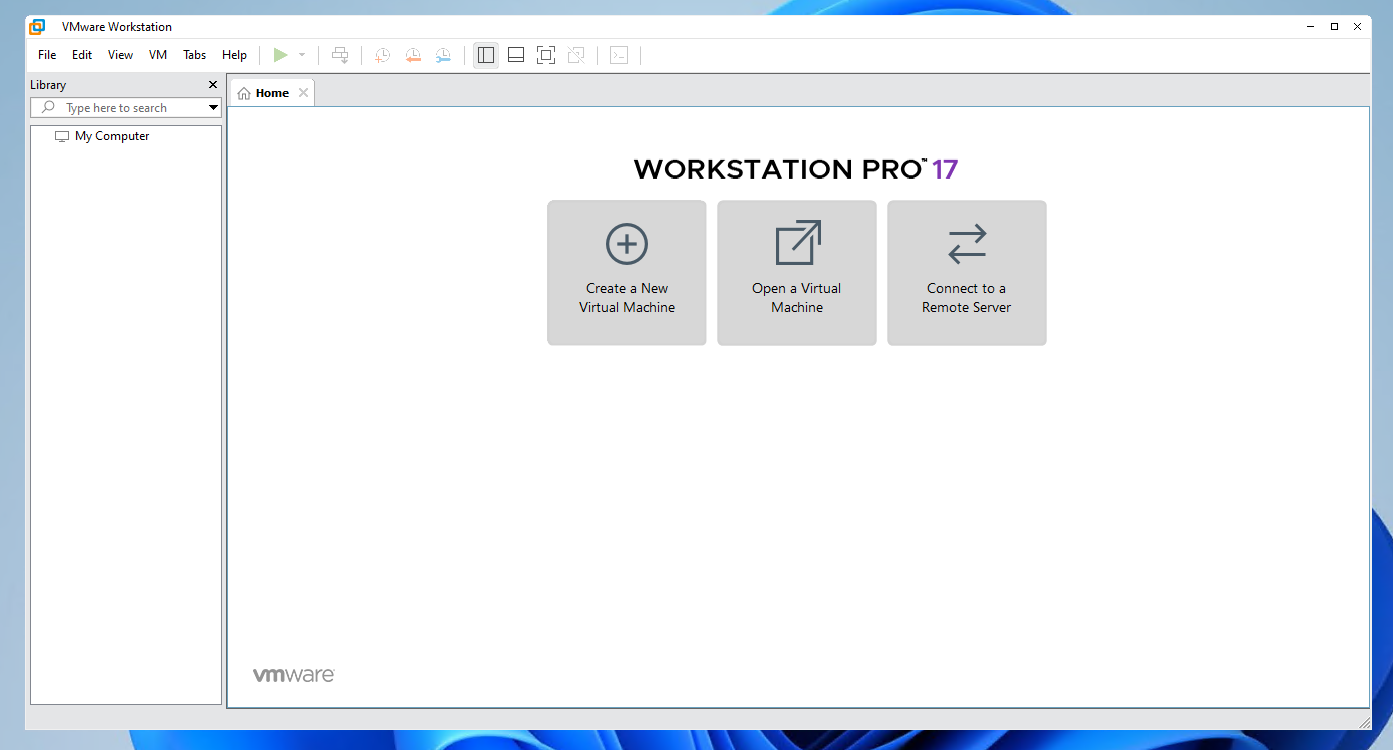
You should now see a screen that looks like this.
- Press
Create a New Virtual Machineand confirm withNext. - Select the Windows ISO that you downloaded in step 2.
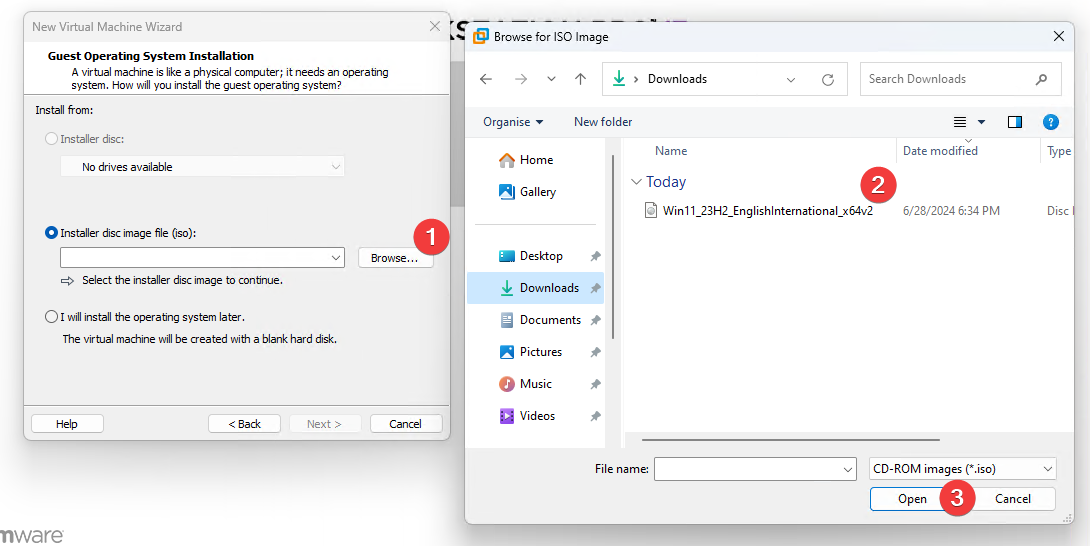
- Press Next until it asks you for a password.
- Enter a password that you will remember. This is required for the VM to be created.
- Choose a disk size. (64GB is fine. Changing this to a single file will slightly help performance.)
- Press Next / Complete this creation process.
- Turn the VM off under
VM>Power>Shut Down Guest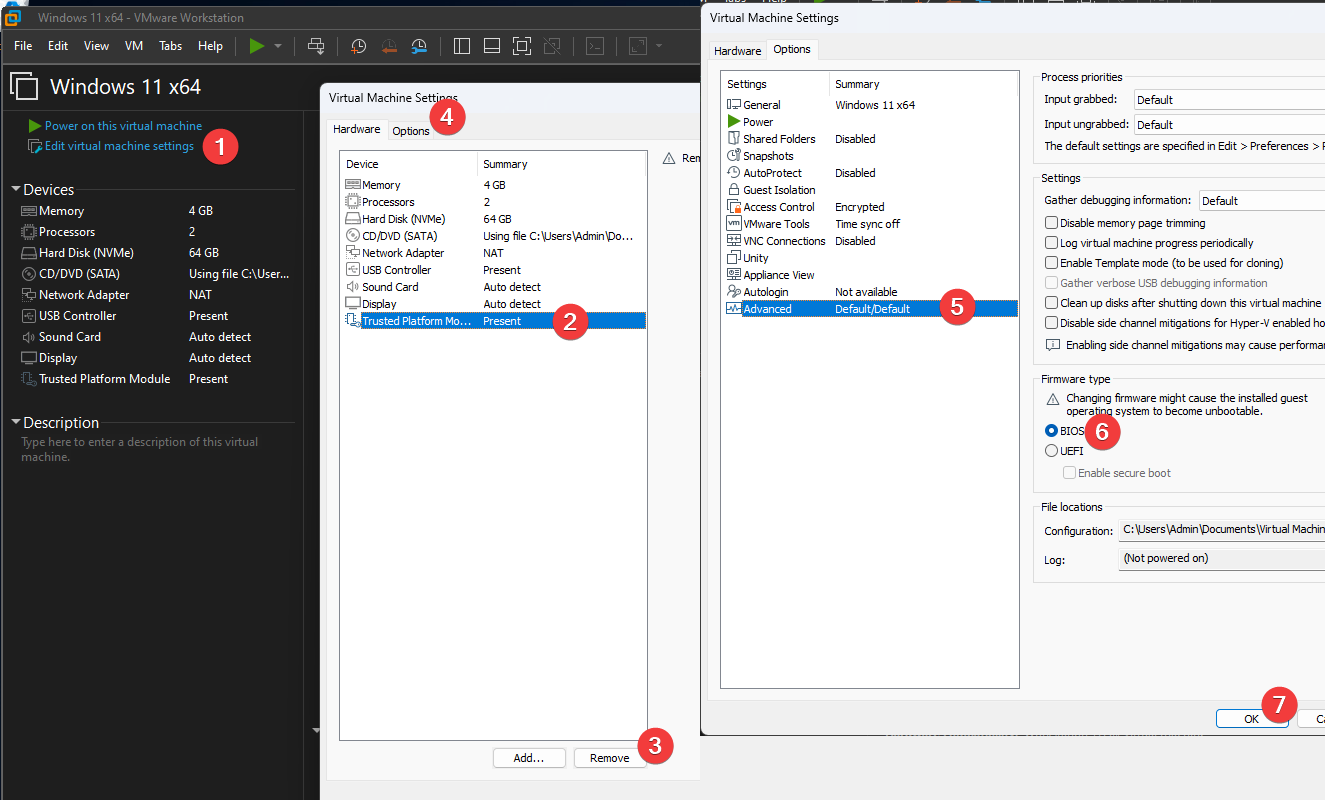
- Start the VM.
If your mouse gets stuck inside of the Virtual Machine, you can press Ctrl + Alt to release it.
- Click next, and click the button that says
I don't have a product key. - Select
Windows 11 Pro - Before you press Next, press
Shift + F10. This will open the Command Prompt. - Type
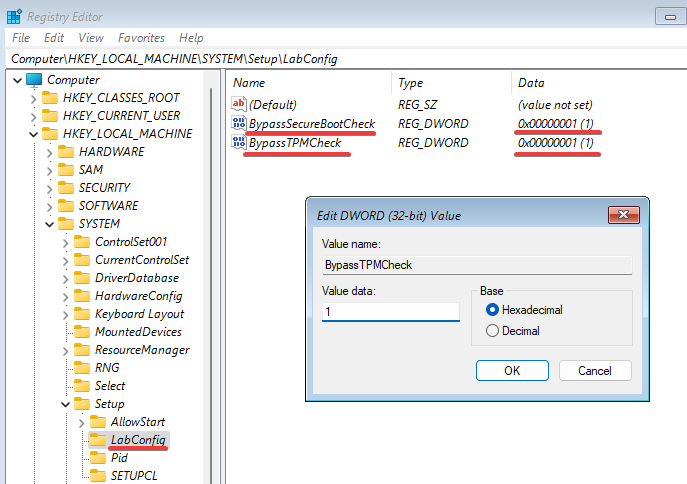
regedit - Navigate to
HKEY_LOCAL_MACHINE\SYSTEM\Setup - Right click the
Setupfolder and create a newKey. - Rename this Key on the left hand side
LabConfig. - Right click in the blank space in the right, and create a new
DWORD (32-bit) ValuecalledBypassTPMCheck - Double click
BypassTPMCheck, and set it to1, and clickOK - Right click in the blank space in the right, and create a new
DWORD (32-bit) ValuecalledBypassSecureBootCheck - Double click
BypassSecureBootCheck, and set it to1, and clickOK
If these entries are not correct, Windows will complain about not being compatible with this device.
- Close Regedit, and Command Prompt, and click
Next. - Accept the EULA & Click
Customised: Install Windows only (advanced) - Click
Next.
Windows will now install, and restart itself! Congratulations!
Setting up Windows
You should be able to progress through the Windows installation as you would with any normal device. Please select the appropriate keyboard layout as you would, name your device,
If you want to avoid making a Microsoft account, you can follow the below steps.
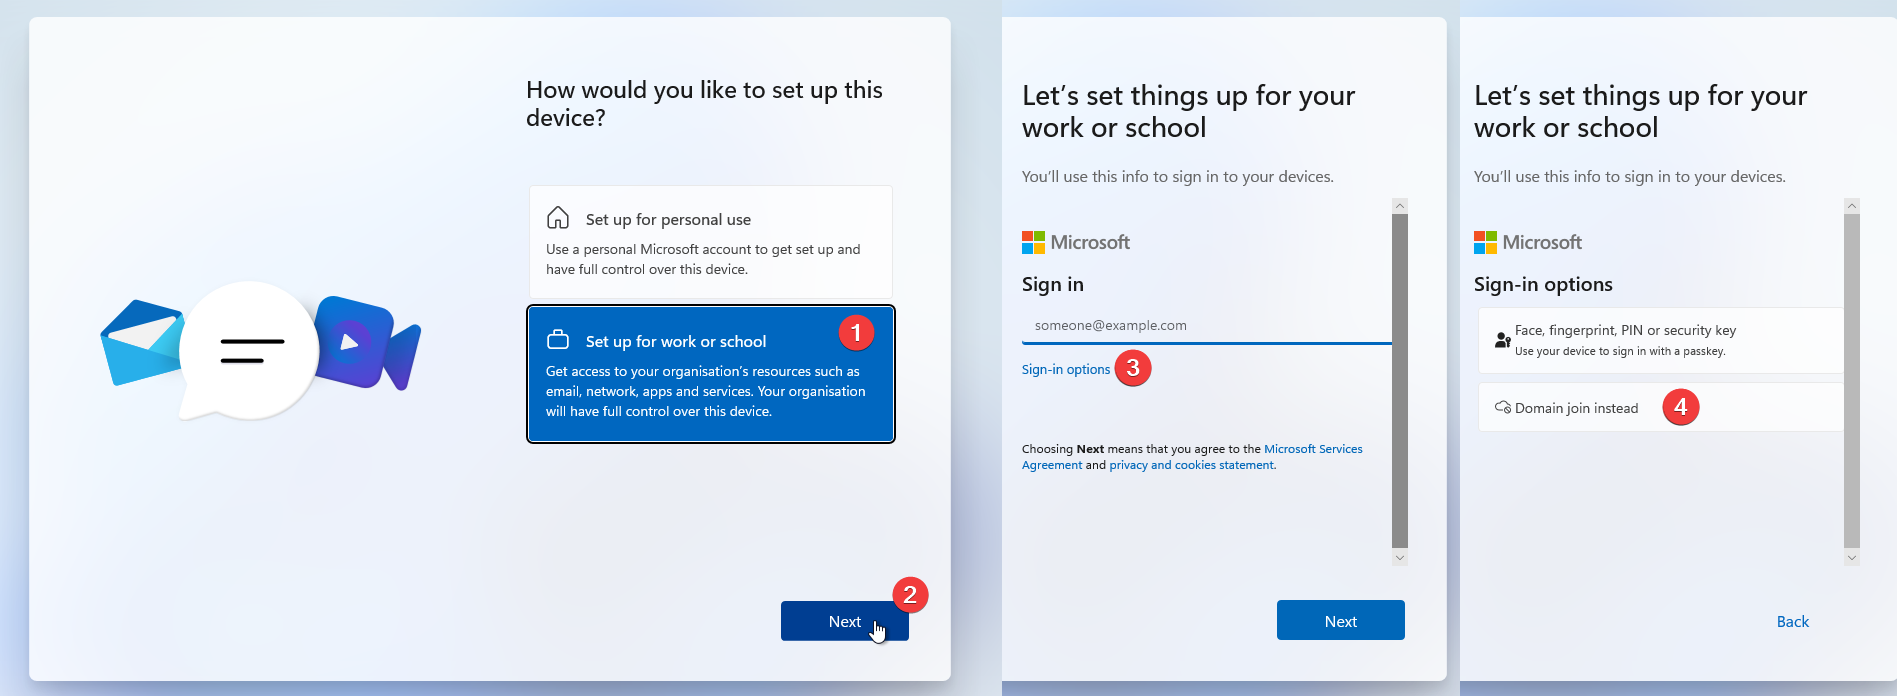
Once this is done, you can choose the name of your account, password, security questions, and privacy settings.
Windows will now restart... again.
Installing VMWare Tools
VMWare Tools is a suite of additional tweaks and modifications that fix the performance characteristics, and other quirks of a virtual machine.
On the bottom of your VM, you should see a yellow bar prompting you to install VMWare Tools. Press Install Tools, and a Drive should appear in your Windows install. Navigate to D:\ and run setup64.exe.
If the VMWare Tools banner doesn't appear at the bottom of your screen, you can install this with VM -> Install (or Upgrade) VMware Tools.
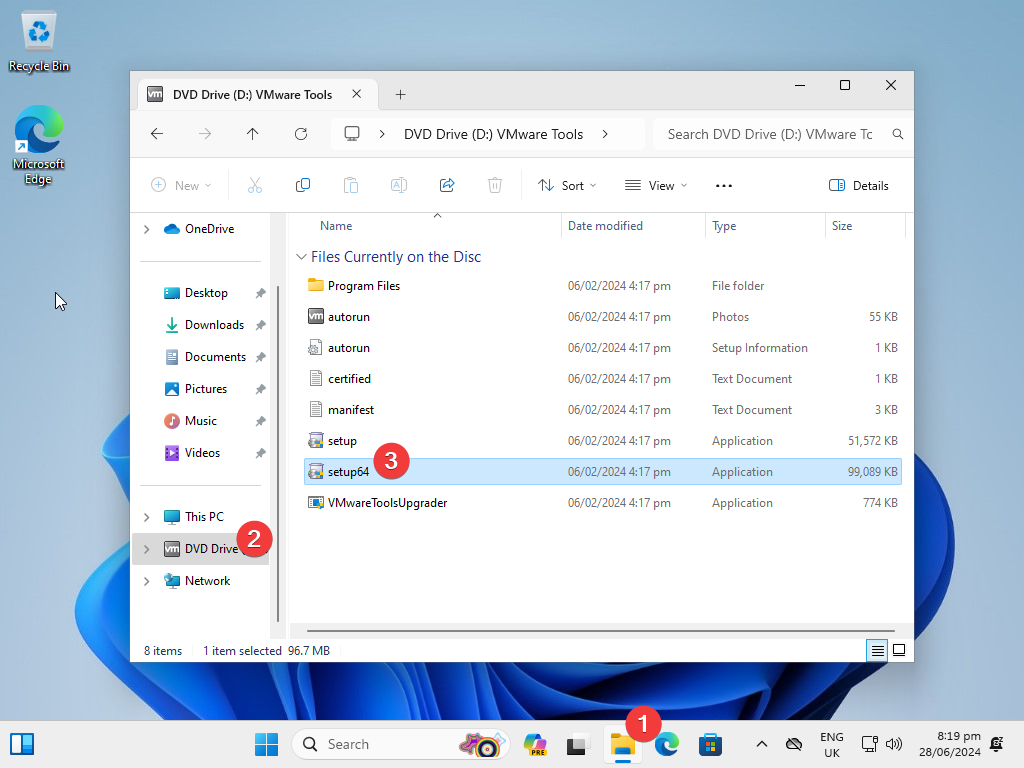
Accept the Windows UAC prompt, and press Next until you get to the end of the installer and press Yes to reboot.
What now?
You have a virtual machine for whatever you want to use it for. If you want to install Minecraft, or other mods. I recommend that you read How to Install Mods.
If you want to pass a Keyboard & Mouse through to the VM directly, you can do that by going to VM -> Removeable Devices -> TheDeviceYouWant -> Connect (Disconnect From Host).
Sometimes certain devices won't show in your list of removeable devices. Please navigate to your virtual machine settings with the VM off, and enable this setting.
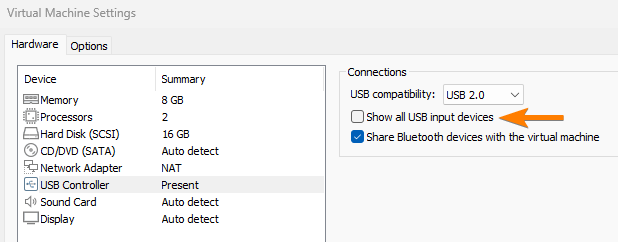
If you're having weird mouse issues (inconsistent acceleration / gliding issues) you can modify your .vmx file to change the mouse mode to "Gaming".
This will typically only happen if you click your main mouse into the VM as opposed to using a seperate mouse that is locked to that window specifically.
To fix this, add mks.gamingMouse.policy = "gaming" to your .vmx file in the location you save your VM files (by default this is C:\Users\%user%\Documents\Virtual Machines).
Things to keep in mind
- Make sure to install VMWare Tools, this will allow the window to resize and will increase performance dramatically.
- If you're assigning multiple cores, make sure to assign multiple cores per socket, instead of multiple sockets.